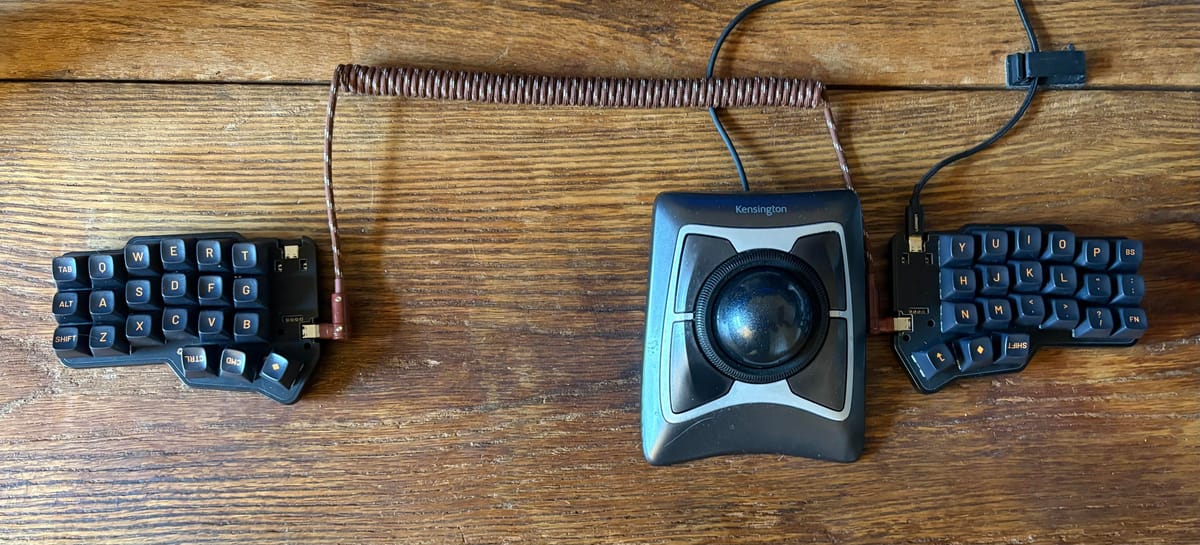
markstos Corne 42-key layout
The perfect keyboard is invisible. The typing is accurate. It doesn't distract me. I'm in the flow state. I type as fast as I think.
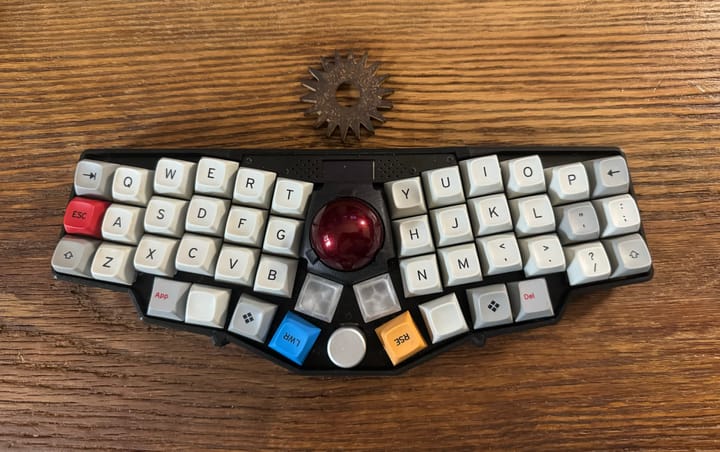
The Corne keyboard has only 42 keys. There's a simple ergonomic principle behind the design: every key is at most one away from the home row. All can be reached by feel with confidence.
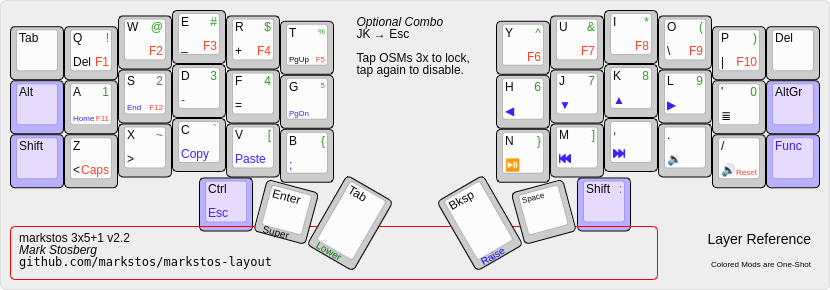
This is the layout I use on my Corne with the QMK firmware. With all keys easy to reach and ergonomic, it has improved my flow. My typing speed has increased from 65 WPM to 85 WPM.
Like a 3x5 layout with a bonus column
The layout uses 3 rows and 5 columns on each hand for all common keys. But unlike a strict 3x5 layout, an outer sixth column is used for rarely used or optional keys.
I settled on this after testing both 3x6 and 3x5 layouts for months. I liked the ergonomics of the reduced pinky use of the 3x5 layout, but found certain keys slow or error-prone to use.
Layout design goals
Be similar enough to conventional laptop keyboards so that switching back and forth is not too painful.This was an original goal, but as I use my Corne now almost exclusively, the layout has diverged further for my laptop keyboard and instead optimizing for the best typing experience.- Most keys should be triggered by one or two key presses.
- Minimize awkward hold-and-tap sequences by using one-shot modifiers.
- Move work from weak pinkies to strong thumbs without overloading them.
- Thumbs should rest on commonly typed keys
- HJKL navigation, like Vim or Helix editors
- Include media keys
- Friendly for tiling window managers
Non-goals
- There is room for RGB lighting controls on the Adjust layer, but I don't use lighting and these were removed to simplify things. Lights were novel but distracting. The keyboard is small with every key easy to reach, so there's little reason to look at it, even in the dark.
- OLED display support has been disabled to save space in the firmware. Another distraction removed.
- Likewise, there are no mouse-key bindings. I tried these and they are slower than just switching to the mouse and back. A dedicated pointing device is the right tool for the job.
Summary of layout
Most functionality is on three layers: QWERTY, Lower, and Raise. The Lower layer contains numbers and symbols while the Raise layer focuses on navigation but also contains some additional symbols. A fourth "Function" layer contains things I rarely use: Function keys, Caps Lock, and Reset.
Let's look at the layers one by one.
QWERTY Base Layer
There are no surprises with the alphabet keys, but there are some interesting choices for the pinky and thumb keys.
Common keys have been moved from pinky positions to thumb keys: Enter and Space are very common and get prime positions on the centered thumb key. Backspace and Shift keys have also been moved from pinky positions compared to a traditional keyboard.
What's shown here as the "Super" key for Linux is also known as the Windows key or the Command key on macOS.
The "bonus" columns in the markstos layout
Half of the keys in the outer columns are also available within the 3x5 layout as well: Delete, Tab and Shift.
For the Tab key, there's a choice between a traditional pinky position or a thumb key. I use Tab on the thumb whenever I can, while the outer Tab key is there for key combinations like "Super+Tab", since those two keys are on the same thumb.
I rarely use the Delete key, but it's there in the right hand bonus column in a similar position to a laptop keyboard.
Shift in the left bonus column primarily for cases when the right hand is on the mouse– shift-clicking. It could also be useful with the arrow keys on the navigation layer. More on Shift below.
There are three keys in the bonus columns that don't appear elsewhere: Alt, AltGr, and the Function Layer key. These are all keys that I had previously found a place for in a 3x5 layout, but were either slow or error-prone to use.
Now they sit in the rarely used outer columns and are fast and reliable to access when I need them. 🎉
I use AltGr as part of the "us(altgr-intl)" layout to type characters unique to Spanish, French or German on what's otherwise a US layout.
Benefits of a thumb shift key
Thumb shift key shines when typing an all-caps word. With pinkie-shift, normally you switch back and forth between the left and right shift keys depending on which character is being typed, and typing an ALLCAPS word would mean double the number of keystrokes as Shift is typed for each character.
To type an ALLCAPS key with this layout, hold down the thumb-shift key, type the whole word and release– the thumb shift works when typing with either hand.
While it may look weird to have asymmetric shift keys, they are more like primary and secondary. I use the thumb shift key nearly all the time as a one-shot modifier. The left shift key is useful in combination with the navigation layer.
As a one-shot modifier, I can also quickly tap the shift key three times to lock the modifier. I also use this as CapsLock alternative. Tap shift again to exit.
Just one combo (chord): Press JK for Escape
Over months, I tried adding several QMK Combos, where two keys are pressed at once to produce another key. What I found over and over again was that combos were often slower or less accurate than using layers. A key on a layer could also use two fingers pressing two keys, but requires less timing precision than Combos do.
So while I like the idea of combos, there's only one left that I prefer to use, and that's having Escape on the home row by pressing J and K at the same time. Escape is also accessible by using two thumb keys.
Lower Layer: Number and Symbols
Typing a single number is arguably faster with a dedicated number row. But numbers often come in clusters, like a date (01/02/2020), a time (12:04) or a cost: ($1,234.05). As you type a string of keys on a dedicated number row, the whole hand moves up to the number row– you've lost the grounding of the home row. Typing "$4" on a traditional keyboard isn't particularly convenient because the "$" and "4" are on the same key.
In this layout, just hold the thumb on the number layer once, type the whole stream of numbers and symbols with your hands comfortably on the home row the whole time and release. The colon is repeated on the number row to help type times like "12:34"
Typing "$4" is no problem as the numbers and their shifted symbols are broken out with unique key codes.
The comma, period, and slash keys are repeated from the base layer to support typing full dates, times, and currency values without switching layers.
I frequently type the tilde when working in a CLI and commonly type the backtick as well when formatting Markdown. On a traditional keyboard those would be long reaches for the weaker pinky, but here they are conveniently located for stronger fingers to use.
How to type combinations like Control-Alt-4
Control and the number layer key are both on the same thumb, so they can't both be held down at once. The apparent conflict is solved with one-shot modifiers.
To type Control-Alt-4, tap Alt, tap Control, then hold the number layer modifier and type "4".
I tried using home-row mods but I prefer this.
Raise layer: Navigation and more
In addition to arrow keys, the navigation layer also includes Home, End, Page Up, Page Down and the App key. On my traditional keyboard I avoided using those keys because they were inconvenient. But these navigation keys are supported in nearly every application, so the navigation layer gives your home row navigation superpowers.
The "App" key is useful for showing context menus via keyboard that are usually shown with a right click.
The "Home" and "End" pair are placed next to each other with Home coming before End, while Page Up is placed above Page Down.
When you misspell a word and see the red underline appear, the App key is perfect for that case. Use the home row arrow keys to move the cursor back and press the App key just to the right of the arrow keys. The context menu with spelling options will appear. You can use the arrow keys to select your option. Done? Use the End key to return to the end of the line.
The whole sequence can be done by holding down the thumb key for the Navigation layer and staying on that layer.
If you need to select text during this process, the left Shift can be used for this.
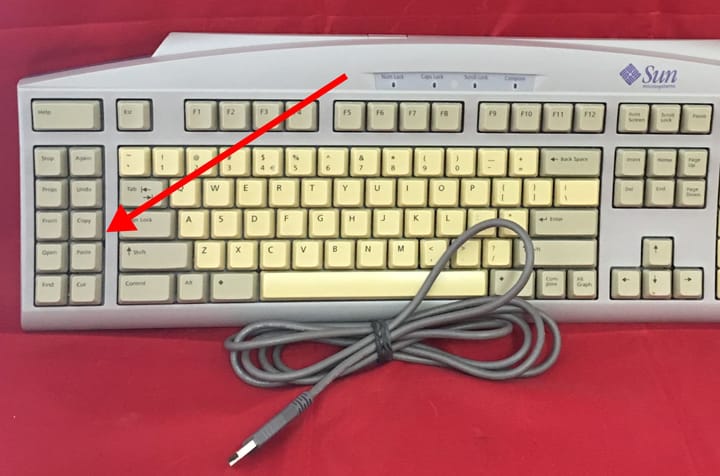
The navigation layer also contains "Copy" and "Paste" keycodes, placed on the "C" and "V" keys usually used for copy/pasting. These are useful in terminal apps where "Control-C" and "Control-V" are reserved by the shell, so "Shift-Control-C" and "Shift-Control-V" are typically used instead. By using the navigation layer, Copy and Paste returns to being a two-key job. Also, as long as your favorite apps support these uncommon keycodes, you can use the same copy/paste shortcuts as universal copy/paste instead of remembering that the terminal requires an exceptional combination.
Function layer: Function Keys, Caps Lock, Reset
The Function layer is minimal and rarely used. It contains function keys, Caps Lock, and Reset. I triple-tap my one-shift Shift key to enter a Caps Lock mode, but for now, I've left this dedicated Caps Lock key.
What about a 3x5 layout?
If you wish to adapt this to a 3x5 layout, you just need to find a home for the Alt and Func keys, and if you need it, AltGr.
Compared with the Miryoku layout
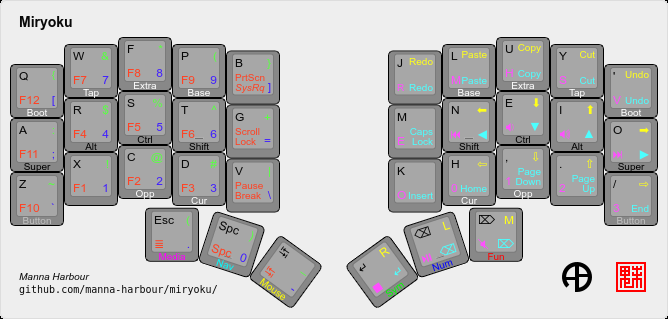
I studied the Miryoku Layout, which is an elegant 3x5 layout. For my tastes, I'm a big fan of one shot modifiers and there is simply not room to use them in a 3x5 layout. While I imagine it's possible to "dial in" the time between a tap and hold so you can type both fast and accurately when using dual-use home row modifiers, with one-shot modifiers there are no timing issues. Tap them or hold them as quickly as you like!
The markstos layout is a less radical departure from traditional keyboard layouts. For example, it puts numbers and symbols in the same columns that appear on a normal keyboard.
Any regrets or weaknesses?
To type "Super-1" requires awkwardly holding down the Super key and number layer key with the left thumb. I don't need this key combination. I only use Super with the Sway tiling window manager and I set all my Sway keybindings to use keys on the base layer. When holding Super, I treat the top row as if they are number keys, so Super-Q goes to workspace 1, Super-W goes to workspace 2, and so on. Since I'm not looking at keyboard, I visualize Super-Q as "Super-1".
While Control and Super are both the left hand, that's solved with one-tap mods: Control-Super-L is done by tapping Control before holding Super and tapping L.
Visualizations
- (PNG)
Download
The code for this layout is available on Github.
Variations and Ports of the Markstos layout
- ZMK Port of markstos layout, including Bluetooth support.
- A Cantor keyboard layout inspired by the markstos layout, by jpcairesf
- markstos layout for cocot4plus, a unibody Corne layout with trackball.
- markstos layouts for Boardsource Unicorne, with and without pointer enabled.
- thrly's ZMK config is inspired by both the markstos and miryoku layouts. An older revision is published for Vial. Read more about it in the related blog post.
- Benjamin5678 ported the markstos layout to Vial in March, 2025.
Which Corne keyboard to choose?
I use the BoardSource Unicorne. Some things I like about it:
- Durable build with aluminum case option
- Hotswap switches
- MX spacing and keycaps, although there's a low-profile option as well
- USB-C to connect the halves, reducing the chance of a short
- Options for pointing devices and tenting
- RP2040 MCU for easy flashing and plenty of storage
While the retail price of these is fair, the patient will occasionally find these appearing on eBay or Reddit's MechMarket at a discount.
Disclaimer
This is my personal layout and is subject to evolve further with my tastes. Fork your own copy if you need stability. Suggestions welcome.
Comments ()